
Block 1 - Square Wheel
by Lynne Hagmeier, Kansas Troubles Quilters
I'm honored and delighted to kick off the 4th round of Moda Block Heads. I never dreamed when I approached fellow Moda designer, Lisa Bongean of Primitive Gatherings, at Quilt Market several years ago and suggested we gather all the "dark" designers to host a block hop that it would result in a book with Martingale and subsequent block hops with even more Moda designers! Whew! What a ride.
For those of you returning - Welcome Back! For those of you new to Block Heads, know that it isn't a race or a competition. We're all just happy to share our designs with you as sister quilters, and maybe teach a few tips and tricks that we've learned along the way.
For my fabric selection, I started with scraps from my upcoming collection of red/tan/blue Freedom Road. I'm loving the patriotic feel of the line, but also that it can be blended into my other KT fabrics. I'll add reds, tans, blues and golds from previous lines for a scrappier feel as the weeks progress.
 |
| Freedom Road by KTQ for Moda |
These are the staples of my piecing arsenal - an Oliso iron, a spray bottle of starch mixture, pressing block, a small ruler and a Sewline marking pencil. Along with my wool pressing mat, I have seen improved results in my piecing accuracy over the years using these items.
I used Magic Sizing for years, but wasn't always happy with the outcome. When Joy Johnson (KT employee) found a recipe for sizing using Sta-Flo starch, potato vodka and distilled water, we all tried it and found it left our fabric crisper without the flakes of spray starch. Then Lisa Smith (KT employee) introduced me to Terial. It's a liquid starch that when used undiluted, will make your fabric as stiff as cardboard! I prefer a mix of 2 parts water to 1 part Terial for a nice, crisp finish that makes cutting and piecing easier. No stretching or distortion of fabric. I love it!
I know alot of designers soak their fabric in starch and hang it dry, but I honestly don't have the space, time or inclination to do so. Be sure to spray & press all precuts as well as yardage before starting your project. L
 |
| My Favorite Piecing/Pressing Tools |
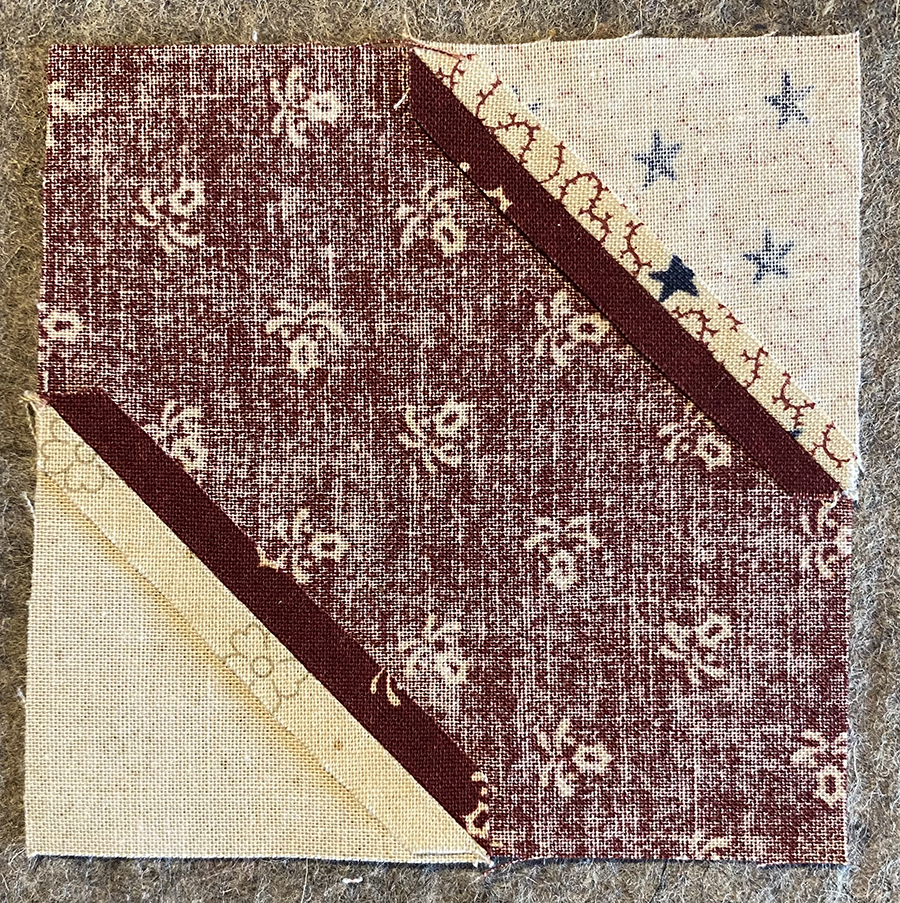
My block, Square Wheel, incorporates an element of piecing that has challenged me over the years. Connector Corners, or flip-and-sew corners, were always a dreaded chore. Now I've learned to mark the diagonal line across the wrong side of the connector corner square (blue) and stitch right next to the line closest to the corner, as shown. Basically, I'm leaving the drawn line as the fold line so the top triangle, when folded toward the corner, will match the background square's corner. It's practically foolproof! However, I always stitch one corner and test the fold before trimming any seam allowances to make sure I'm on the right track.

I add two connector corners on opposite corners of the block, then trim the seam allowance to 1/4" and press the seams open. I dry press the seam, then spray with starch and press again, finishing with the pressing block while I move on to the next block. For those of you who have not used a pressing block, find one now and try it! I'm amazed at how much flatter my seams lay after pressing with starch and laying the pressing block on the open seams for a few seconds. It's a game changer for me, especially with smaller pieces.
Add the remaining two connector corners and repeat - draw line, stitch, trim, press, block.
I pressed the seams open on the red/tan side bar units, too. Since they don't match up to any other seams, I like to keep the block as flat as possible. My main suggestion for these is when you're chain piecing pieces that are exactly the same length (squares or rectangles), lift the presser foot before starting to sew each unit. (It's one reason I LOVE my Bernina knee lift!) I think it helps to keep the presser foot from pushing the top piece that 1/16th of an inch that drives me crazy.

You've probably noticed by now that I didn't begin by stitching the center 9-patch together. That's because I wasn't sure how I wanted to place the fabrics in the center. By making the rest of the block, I could see how the different options would look before committing to one way. Here are my options:
 |
| Option #1 - light tan print 9-patch corners |
Option #2 - 9-patch corners match D-connector corners and bars. Obviously, I chose option #2. I liked the more definitive cross/plus in the center and thought it rounded out the center of the block.
While most of the seams within the units are pressed open, I always press seams in the block rows for opposing seams. For this block, I press toward the red/tan bar units. This ensure perfect intersections and a more square block overall.
Side Note: My grandson called this block Flat Tire instead of Square Wheel. Five out of seven of us in the family have had tire issues in the last two weeks!

Here's the back of the block so you can see the pressing details. After sewing the rows together, I pressed the final two seams open.

HERE is the link to my block on Moda's website
Again, Welcome to Moda Block Heads #4! I'm so excited about the blocks coming up this year.
Better get back to my sewing machine.
See you next Wednesday!
Beautiful block! Thank you! But your link to the PDF isn’t working.
ReplyDeleteI copied the link and pasted it into my browser and it worked.
DeleteI copied it too and it's bringing me to old Blockheads.
DeleteCopy and pasted the entire path, including the PDF, and it pulled up this new block for me.
DeleteThe link works on the Moda post >> https://my.modafabrics.com/inspiration-resources/blockheads-4-archive
DeleteGood Morning! Love Block 1 and thank you for posting early!
ReplyDeleteYou're welcome! At least that part worked!
DeleteI love your beautiul block thank you!
ReplyDeleteThanks for joining us for BH4!
DeleteWhat a great post of technical info with wonderful photos. Even as an exper. quilter, I learned some new helpful hints. Thanks.
ReplyDeleteWe all learn over the years. I love teaching workshops because I always pick up a good tip from the quilters.
DeleteThank-you for all the tips for better piecing! The block is great, too.
ReplyDeleteYou're welcome. There's so much more to come!
DeleteAnd it all begins again. Thanks for sharing.
ReplyDeleteGlad to be part of BH4.
DeleteLove the block. Thank you for all the detailed instructions, can't wait to get this one going, and thank you for posting early.
ReplyDeleteEnjoy!
DeleteThank you, your block is beautiful.
ReplyDeleteI'm really loving working with the new red/tan/blue Freedom Road line. It's a fun change for me.
DeleteGood Morning, Your block is beautiful and instructions awesome. Thank you
ReplyDeleteYou're so welcome! And we have so many more fun weeks to go!
DeleteI'm not seeing the link! Where can I find it???
ReplyDeleteNVM - I see the link now toward the bottom of the page, but had to copy and paste it.
DeleteCan't get link to work. Can't copy and paste
ReplyDeleteI understand it doesn't work as well to copy/paste from a phone or ipad. My blog site updated and did not allow me to fix the link. Sorry for the inconvenience. Moda will add the block to it's library for easy access.
DeleteI am not able to get the 1st pattern for blockhead 4
ReplyDeletegood morning! What a nice welcome. I'm a big fan, have a wonderful collection of KT fabrics, which I just last spring started using for table runners and general kitchen, dinning room accessories. Love the downhome feel of everything. I'm a 5 & dime, and spare change kind of gal. See ya
ReplyDeleteThanks so much! So glad you've tried 5 & Dime technique. See you next week.
DeleteCan we print the instructions? I cannot seem to find a pdf
ReplyDeletehttps://my.modafabrics.com/webfiles/bh4_1_lynne-hagmeier_square-wheel.pdf
DeleteThis comment has been removed by the author.
DeleteIs there a pdf file that can be downloaded? I don't seem to find one. Thanks.
ReplyDeletePlease see my comment above. Copy/paste this link:
Deletehttps://my.modafabrics.com/webfiles/bh4_1_lynne-hagmeier_square-wheel.pdf
This comment has been removed by the author.
ReplyDeleteThanks sew much. Great instructions.
ReplyDeleteYou're sew welcome!
DeleteI’m unable to get that link pulled up on my iPad so that may be the trouble some people are having. I’ll try on computer.
ReplyDeleteThank you for the great block design. And, the tip about the Terial product. Definitely going to give it a try! Thanks!
ReplyDeleteIt's been a game changer for my piecing accuracy, even after 30 years of quilting.
DeleteI too am not getting how to get to the first block. I have done everything told here and it will not give me an access.
ReplyDeleteLynne,
ReplyDeleteThank you for the Square Wheel block! Thank you for the beautiful pictures and the wonderful instructions. I didn't have any problem downloading it to my computer.
This is what I read on the Moda Blockhead 4 webpage:
"Look for the URL at the bottom of the post, just under the last picture. Copy/paste that into the browser, and that will take you to the PDF with the instructions. (We'll explain next week why we do it this way.)"
My guess is that Moda would like to have us enjoy the pattern author's blog, look at her instructions, and appreciate her hard work. So they don't just give us a quick link to download a free pattern.
Thanks again Lynne for the great pattern!
Thanks so much for your understanding and patience. I hope everyone reads your comments.
DeleteIf you can edit your post and make the link clickable, I think you will keep people coming here to grab it. Otherwise, others are posting an easier-to-use link. It is a BEAUTIFUL block!
ReplyDeleteBlogger updated after I pre-posted the info. Now it won't let me edit. Sorry for the inconvenience.
DeleteIs there a PDF of the pattern? Am I missing something? Thanks!
ReplyDeleteSorry about the link. I'm not sure why it isn't allowing us to click on it. Copy and paste this to find the pattern-
Deletehttps://my.modafabrics.com/webfiles/bh4_1_lynne-hagmeier_square-wheel.pdf
for the link, it is two lines under her last block picture. It is a website address. Copy the whole address and paste it in your browser and it should work.
ReplyDeleteFun block! Can you tell me which of Terial products you use? I see stablizer and magic fabric spray. Would love an alternative to the starch in spray cans.
ReplyDeleteThank you!
see my reply below
DeleteI buy Terial by the gallon and dilute it myself. The spray bottles are the same thing, just already diluted, but it doesn't give the ratio. For most projects, we use about 50/50 or 40/60 terial to water. For homespuns or tiny piecing, I use about a 60/40 terial to water mix. The gallon is pricey, but it will go a loooong way. Happy starching!
ReplyDeleteThanks for all your work. Great to be part of yet another year of BH! Appreciate you sharing & answering all these ton of questions
ReplyDeleteI appreciate your positive comments.Thanks.
DeleteI found it...thank you very much!
ReplyDeleteWhere is a pdf please?
ReplyDeleteHow great is it to be the designer to kick off a 4th round of Moda Blockheads! I am in love with this block. In fact, I just finished my first rolling stone quilt. I wish I had found your pattern first because I love what you have done with the center 9 patch and different background fabric. It really take this pattern up a notch. So now I will have to make another quilt with your pattern. Oh well, when your in love with a pattern you have to make it (even if you just made a similar one in queen size). I have a bundle of Hope Blooms that I have been wanting to break open & it will look great in this pattern. Thanks for sharing all the tips and the free pattern.
ReplyDeleteOh, yes, I think Hope Blooms would make a beautiful quilt with this block. Please share pics when you make it.
DeleteThank you for your work and for sharing so many tips and illustrations! Great pattern!
ReplyDeleteYou're welcome! It was such a fun block to make.
DeleteCan I ask where you got a gray Olisio iron? I love the gray!
ReplyDeleteI've had this iron for many years. In face, it was right after Oliso came out with their irons. It's been a workhorse.
DeleteI love the block, thank you Lynn!!
ReplyDeleteYou're so welcome! Thanks for playing along.
DeleteI got my block done had fun doing it. I love it
ReplyDeleteI got my block done. Had fun doing it. Can't wait till next Wednesday for the next block.
ReplyDeleteThanks for joining BH4!
DeleteThank you for your generous and gracious sharing! I am a newbie, so I really appreciate your tips.
ReplyDeletethank you, how fun!
ReplyDeletethanks for showing the backside that is so helpful :0)
ReplyDeleteThanks for joining BH4!
DeleteThank you for a such a beautifully designed block! I loved everything about it and really enjoyed the process - even those teeny tiny blocks in the 4 ½" nine-patch!
ReplyDeleteGlad you enjoyed making the block. There are so many fun blocks in the works.
DeleteShowing your block with seams ironed open is helpful. I am excited to do this block. I'm moving so will start a little behind others bit will catch up as soon as my machine is set up. Your instructions are clean and easy to read. Thank you.
ReplyDeleteThis series is timeless! Enjoy following along and start when you can.
DeleteDear Lynne,
ReplyDeleteWow! I learned so much from your post for Blockheads # one. After reading your suggestions, I starched all of my fabric, I learned how to use my knee lift on my Janome, I kept my wooden tailor’s block right next to my iron and used it on every seam, and I opened seams for the first time. I learned a lot and felt like it made a difference in the block that you shared. Square wheel is amazing.I’ve already made four of them in different fabrics and different placements because I found it so interesting. Thank you so much.
I have attached a photo of one of my very first quilts I made for years ago. I fell in love with the Kansas Troubles line and have used your fabric in several quilts and projects.
Nancy
Thanks so much for all your kind words of support. I hope you enjoy BH4. There's so much good stuff to come!
DeleteIs each quadrant 3.5? Pat Sloan gives such great measurements.
ReplyDeleteI found the answer!!! Thank you I didn’t read the whole pattern. I appreciate this very much. Sometimes my square in a square falls shy but I will fix it in the seams. Thank you for the block!
DeleteI love Block #1 and have decided to use Kansas Troubles fabric for my blocks. I've made several quilts with KT fabric and love it. Maybe I can use up some of my scraps and stash with this project.
ReplyDeleteCould someone give the formula for the Staflo starch, vodka & distilled starch recipe?
ReplyDeleteSorry for the delay in responding. I didn't see your question earlier. I pour 3 cups out of a gallon of distilled water, then add in 2 cups of StaFlo starch and I cup of potato vodka. You can adjust as you wish for lighter or heavier starch.
Delete