Monday, February 29, 2016

More Bees 'n Blooms

KT Winner

Congratulations to Joey for winning last weeks' giveaway of our new Buzzz pattern and Bees 'n Blooms charm pack. Please be patient, as the precuts haven't shipped yet and I used the few I received from Moda to make my quilts. Bees 'n Blooms is coming in March, so you'll have your goodies soon.

Joey Ritenour  February 24, 2016 at 4:55 AM - I love the Buzzz pattern! There is a great deal of motion in this quilt--you can feel the hive buzzing. I'm need to put this on my summer "to do" list. It will look great in my classroom--we are the Yellow Jackets!
 
I love that you're a teacher in a school with the Yellow Jackets as your mascot - too perfect! What a great way to introduce your students to quilting.


Bees 'n Blooms

So, the fabric collection is called Bees 'n Blooms, the book is named Bees 'n Blooms, and the featured quilt is also called Bees 'n Blooms. When you hit on a good thing, why change it up? One of the hardest parts of designing for me is naming everything, from the individual prints of each fabric and colors in the line, to the overall collection, and then each project made with that collection. Geez! One of the quilts in the book is usually the inspiration behind the name, so I'm just gonna go with it.
 
 I'm trying a new format for our fabric collection patterns. We're including 2 or 3 unique ideas in a book with a couple coordinating, smaller projects - all for one price. The book is 8" x 8", a size I really like to work with. It's stapled, so the pages lay flat when you're working on a project and need to see cutting or assembly directions. I think it works better than 2 or 3 "patterns in a bag" with loose pages. And, for only $15.95 for 6 projects, it's a great value, too! I'd love to hear your feedback.

Bees 'n Blooms lap quilt - JR background with raw edge applique
Bees 'n Blooms has a pieced background made using a Jelly Roll. So simple. Not alot of math. Easy layout - really. Then, almost all of the appliques are made using our KT Melon Template - red flowers, blue flowers, some leaves, tulips - all easy to cut with a rotary cutter and the template. The purple flowers use the mini melon cutout in the template, so it's easy to draw onto fusible web and cut them out. I like having the fusible on the smaller pieces for easier placement/fusing for stitching, too. 


Even the bees' body & wings use the mini melon template!

 
I had a few pieces left over and couldn't let them go to waste, so I whipped up this adorable Mini Table Treat 17" round table topper, too. I think it will make a sunny backdrop for a vase of flowers, a candle or my bowl of M&M's. How would you decorate with it?

Bees 'n Blooms Mini Table Treat
 
Of course, I include the melon shapes in the book so you can make your own template, if you prefer. This week, you can win the Bees 'n Blooms book and the KT Melon Template by commenting here about your love/hate affair with applique. Are you a traditional needle turn gal? Like to simplify with fusible? Tell me all about it. 
 

Indiana Heritage Quilt Show

I'm off the Bloomington, IL to teach at the Indiana Heritage Quilt Show along with my quilting buddy, Pam Buda of Heartspun Quilts.  I'll be teaching classes all three days, so look me up and say "Hi!".   


Tuesday, February 23, 2016

Bees 'n Blooms, Coming Soon!

KT Winner   

Congratulations to Patricia Çarluccio - Just a note to let you know I love this wall hanging and ready to do more for Christmas gifts. I am a quilter of larger quilts and was looking to something smaller and faster.the fabrics are beautiful and work so well together. Can't wait to get started on many more. Thank you so much, Patrica.

Patricia, send your mailing address to lynne@ktquilts.com and we'll send your goodies right out. 

We have a second winner this week of the new book, I Love Log Cabins, by Martingale. My easy log cabin quilt, Framed, is included in this fun book with quilts by over a dozen different designers. 
 Congrats to:Terri Mc -Thanks for the heart pattern. I love how you can simplify things !  And Happy Anniversary !!

I hope everyone had a lovely Valentine's Day. Robert gave me his sinus infection as an anniversary gift this year. Definitely not the most romantic. That would be the reason this blog post is a bit late. I recuperated over the weekend, hanging out with our retreat ladies, then had to hit the ground running Monday to catch up. I realized this morning since the KT Stitch With Me is over, I had to figure out what to blog about. With March and the promise of spring flowers just around the corner, we have alot to talk about.

KT Stitch With Me

First of all, I want to thank everyone who followed along and stitched with me. What a fun way to make a simple little quilt with alot of personality. I have parts of several that I plan to stitch together for gifts. Feels good to be ahead of the game for once. This one was so much fun, watch for another Stitch With Me later this summer.

Bees 'n Blooms

We're anxiously waiting for the UPS guy to bring our order of Bees 'n Blooms, my newest collection of KT fabrics by Moda. We'll have bolts, precuts, fat quarter bundles and patterns galore. Until it arrives sometime in March, all I can do is share with you all the fun projects we've made with this bee-u-ti-ful collection. I love the little bees, swirls and honey trails along with large and small flowers, of course. Shades of red, green, navy, purple, gold, black & tan swarm together to create a delightful assortment of quilts for your spring decor. Stay tuned over the next few weeks to see all the Bees 'n Blooms projects.


The Buzzz charm pattern is my new favorite. Charm squares plus one simple block featuring our layered patchwork turns simple into adorable. No one minds this charming bee hive!

Like it? Love it? Win it! Comment here to win the Buzzz pattern plus a Bees 'n Blooms charm pack. Come back each week for more chances to win the Bees 'n Blooms book and scrap packs. We'll "bee" seeing you!


Monday, February 15, 2016

KT Stitch With Me - Week #4

KT Winner

The winner of the Crazy for Minis book and Bees 'n Blooms Mini Charm is
Vicki T - What a great way to make flying geese. I agree ~ GENIUS! I've never been afraid to make them the usual way, but doing it this way you erase the fear whether you'll be having to unpick seams because you've stitched too far in and lost your points. Love it! Thank you for showing us to make them this way. 

So fun to see all your comments each week. Keep 'em coming!

KT Stitch With Me - Week #4

Are you having fun yet? I can't wait for you to finish your MC Sampler! Now that we've pieced a star, surrounded it with checkerboard squares and a red border, we're ready to add our border of flying geese. Just for fun, let's make some easy pinwheels for the corners!

Pinwheels
 Cut: (4) 2 1/2"  mini charm squares (X) - cut a square twice diagonally to yield 4 triangles
         Tan background - (16) 2 3/4" sq.

Outer Border - (4) 2 1/2" x WOF (width of fabric)
           Binding - (4) 2 1/2" x WOF


Select (4) dark MC squares for the pinwheels. I chose red, green, navy & purple. Cut each MC 2 1/2" square into (4) triangles, as shown.
Cut (4) MC squares into 4 triangles each.

Position the (4) matching triangles on the inside corners of (4) tan background 2 3/4" squares with triangle points even with tan background corner (no points extending); glue in place. 

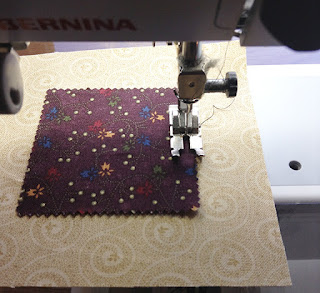
Topstitch 1/8" from raw bias edge of 90 degree angle of triangles with coordinating cotton thread. Remember, there's no need to stitch around the long side of the triangles since that will be in the seam allowance.


Topstitch triangles 1/8" from raw bias edges.

Sew (4) matching layered triangles together in a pinwheel block that measures 5" square; press as below.

 
For the least bulk, press as shown.
 Pin and sew a flying geese section to opposite sides of star/checkerboard quilt center; press toward geese. Add a pinwheel block to each end of remaining flying geese sections; press toward flying geese. Pin and sew to top and bottom of quilt; press. Quilt measures 26" square.


Trim (2) outer border strips to the length of your quilt. Pin and stitch to opposite sides of quilt center; press toward outer border. Trim (2) outer border strips to the length of the top/bottom of quilt. Pin and stitch to top and bottom of quilt center; press toward outer border. Quilt measures 30" square.

Sandwich quilt top, batting and backing using the method of your choice. Lois quilted in-the-ditch, following the seam lines and echo-quilting the layered patchwork on the star points, checkerboard and flying geese. Trim batting and backing. Bind with double 2 1/2" binding pieced end-to-end with mitered seams to at least 132" long.


Wahoo!     We're done!       Happy Dance!    Treat yourself to a trip to the quilt shop!   

Thank you all so much for joining me here these past few weeks for the first ever KT Stitch With Me.I hope you've enjoyed piecing my MC Sampler using our layered patchwork technique as much as I have loved sharing it with you. Want more ideas using this method and Mini Charms? Grab a Crazy for Minis book for more inspiration for little quilts with lots of charm.

Comment here for a chance to win the Crazy for Minis book, plus a pile of mini charm squares leftover from all the projects in the book.  What a great start to your next mini quilt!


Friday, February 12, 2016

Introducing - I Love Log Cabins by Martingale

I'm so excited to share my quilt with you that will appear in a new book by Martingale, I Love Log Cabins. Because, really, I DO love log cabins! What I don't like is cutting a million little strips that are all different lengths (and sometimes widths, too) from a jillion different fabrics that I have to keep straight with pinned-on notes in a dozen piles, then when I'm ready to sew it takes 20 minutes to figure out where I was when I stopped, so I brew a glass of tea, find a snack and turn on the TV and get totally side tracked. Whew! So much to think about! That's why I REALLY LOVE my version of a log cabin block in this book, Framed. It only has two cuts to think about in the whole quilt! I started with a Jelly Roll for even faster results. That's about my speed when I want a simply terrific quilt in a hurry for all the people on my list. Brights, novelties, traditional - it all looks great! . What do you think? Pretty nifty if I do say so myself. :)


Would you like to check out all the fabulous projects in I Love Log Cabins? Many of the designers in the book are blogging about it their quilts this week. Go to I Love Log Cabins to win an ecopy of the book from Martingale, OR comment here for a chance to win this signed copy.


It's not only Valentine's Day this weekend, but also my 29th Anniversary with my lovely hubby, Robert. In honor of all the hearts and flowers and candy and stuff that goes along with the holiday, I'm offering you a pattern called Hearts to You. Print it here and enjoy how easy those hearts are to piece using my Layered Patchwork technique!


Wednesday, February 10, 2016

Quilt Dots Blog Hop


I LOVE my KT Quilt Dots!

Last year, the lovely ladies at Zappy Dots turned pictures of a dozen of my quilts into the cutest magnets ever! They're not just great to hold a note on a chalkboard, but even cooler to wear as a necklace. I switch mine out to suit my outfit, wearing a quilt each day. LOVE, LOVE, LOVE IT!

Quilt Dots is celebrating all of their designers with a blog hop, going on now. Go to Quilt Dots
to see all the fabulous dots and designers and win some really fun prizes.  

Kansas Troubles' Quilt Dots

Monday, February 8, 2016

KT Stitch With Me - Week #3

KT Winner

Congratulations to the winner of a 4-pack of KT Mini Charms! I hope you have fun with them.
Kurt Schindler -Can't wait to see the next step of the project. Awesome, so far.
Charlotte

Thanks a bunch to everyone who's following along on my first KT Stitch with Me. I'm thinking this is too much fun to only do once. Watch for information on the next Stitch with Me later this spring.

KT Stitch With Me - Week #3

We have a Floating Star with a Checkerboard border surrounded in red after Weeks #1 and #2. Now I'd like to share one of my favorite layered patchwork shortcuts - flying geese. This works with any size block, but starting with a precut square is the easiest. Simply cut the charm or mini charm diagonally once (/) to create 2 triangles with pinked 90 degree edges. These are your geese. 

For this project, select 22 assorted dark MC (mini charm squares).
Cut: MC - (22) 2 1/2" sq. (/) cut once diagonally to yield 2 triangles for geeese
         tan - (44) 2" x 3 1/2" background
                  (8) 1 1/4" x 17"  sashing


Layer each triangle on a tan background rectangle with right sides up and bottom edges even. Place a dot of glue on each point to hold in place. 


Topstitch 1/8" from pinked edges of triangles. Do not sew along the bottom edge of the flying geese since it will be in the seam allowance. Make (44) flying geese blocks.


Lay out flying geese in (4) rows of (11) geese each. Sew rows together; press toward geese points. Each row measures 3 1/2" wide x 17" long.

 Sew a 1 1/4" x 17" tan sashing strip to both sides of each geese row; press toward tan. Set aside for Week #4.

How easy was that? I would say genius, but I'm much too modest. :) These really are no-fail flying geese you can use for a million different projects. Here's one from Crazy for Minis that you could whip up in an afternoon!
Comment here to win the Crazy for Minis book and a Bees 'n Blooms mini charm. Bees 'n Blooms will ship in March to your favorite quilt shop. Get yours first! Stay tuned for more fun with Bees 'n Blooms over the next few weeks.

Monday, February 1, 2016

KT Stitch With Me - Week #2


KT Winners

We have 2 big winners this week from my two blog posts last week. The winner of the new
Crazy for Minis book is:


Lewcrese Shields -This is going to be so much fun. I already have the first block done and am ready for the next. What a way to make you look forward to Mondays!!! Thanks a bunch, Lynne.

You are so welcome, Lewcrese! I'm having a blast sharing my layered patchwork secrets with all of you.

And, the winner of the Moda All-Stars All in a Row book is:
Beth J. Beal -I just love how you always manage to stay true to yourself! The Drunkard's Path was also a favorite of mine.

If you haven't checked out the rest of the designer's rows in this book, you still have time. A Beauty of  a Contest is just beginning, now thru March 15th. Grab a book and piece my row, then enter it in A Beauty of a Contest marked #KTacorns and post it on the FB page #AllinARowQuiltAlong. I'll randomly select from those entering my row for another chance to win an All in a Row book! 
Happy Stitching and Good luck!

KT Stitch With Me - Week #2

I love that so many of you are following along for my first KT Stitch With Me series. Last week, we made a Floating Star using KT's Layered Patchwork technique. No chance of chopped off star points here! This week, we're going to frame our star with a scrappy checkerboard border. Usually, that would involve lots and lots of tiny squares pieced together, one by one. That's not how we roll here at KTQ! We're going to begin by layering a MC square in the center of a 4 1/2" background square. Here we go!
If you haven't assembled your fabrics yet, this is the supply list once more.
Supplies for MC Sampler Quilt:
    2 KT Mini Charm Packs
     tan - 7/8 yd.
     navy - fat 1/8
     red - fat 1/8
     green - outer border/binding

Checkerboard Border

Cutting:  From the tan, cut (9) 4 1/2" sq.  background
                                           (4) 2 1/4" sq.  corners
                                           (8) 1 1/2" x 2 1/4" spacer/background
Select (13) assorted dark MC squares. 
Layer (9) MC on top of a tan 4 1/2" square, right sides up. Center MC on tan square with 1" left exposed on all sides. Use a standard ruler and measure 1" on each side to center the MC. 
Dot glue on all 4 corners of MC to hold in place. I love my Sewline glue pen!


OR, use our KT Spare Change ruler to position 2 sides of the tan square at once. We'll be using the 1/4" line, as shown, to have 1" around all sides of the MC (the outer edge of the Spare Change ruler is used with a 5" charm square). Position your Spare Change ruler in lower left corner on the 1" line, then flip the ruler over and measure in the upper right corner for a perfectly centered MC.
Use our KT Spare Change ruler for easy centering of MC.
Topstitch 1/8" from the pinked edges of the MC with coordinating cotton thread. Aurifil #5013 is a great green/gray that blends with all dark KT fabrics so you don't have to keep switching thread. 
Start stitching in the middle of one side of the MC so the thread ends are in the seam allowance after we cut the blocks into fourths. Note the placement of my 1/4" foot with the points of the pinked edge just under the 1/8" notch in the foot.

Topstitch 1/8" from inside point of pinked edges.
Make (9) layered, stitched blocks.
Cut the 4 1/2" layered blocks into (4) 2 1/4" squares, as shown.
Cut (9) layered blocks into fourths.
Cut a 1 1/2" x 1 1/4" rectangle from each of the remaining (4) MC squares. Layer each on one end of a 1 1/2" x 2 1/4" tan with 1 1/2" ends even. Topstitch 1/8" from pinked edge. Add another tan 1 1/2" x 2 1/4" rectangle to the layered end, as shown; press toward plain tan strip. Make 4 Unit A.

Make (4) Unit A

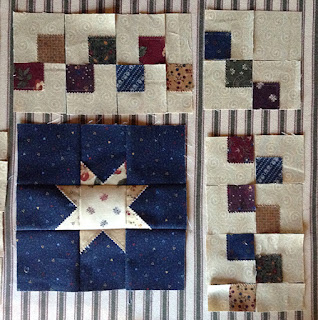
Sew the layered blocks together in pairs, as shown below, for Unit B. Sew the layered blocks together in pairs, as shown below, for Unit B. (TIP: I like to lay out all my blocks around the center star before sewing the units together - see picture below.)
Make (12) Unit B

Make 4 sections - 3B + 1A

 With the remaining 4 layered blocks, add a plain tan square to one side, as shown above; press toward tan. Sew this pair to a Unit B to make a Unit C for corners. Make (4) Unit C.
Make (4) Unit C for corners

I like to lay out all the blocks around my center star first for even color placement.

 Pin and sew 2 side sections to opposite sides of Floating Star block; press toward star. Add Unit C corners to each end of remaining side sections; press toward corners. Add to top and bottom of star. Quilt center measures13 3/4" square. (I know the sizes are little funky, but it will all make sense when we get to next week's blocks. Promise :)
Cut (4) 2 1/8" x 22" strips from red fat 1/8th. Trim (2) red strips for side borders: 2 1/8" x 13 3/4". Pin and sew to opposite sides of quilt center; press toward red. Trim (2) strips for top/bottom of quilt: 2 1/8" x 17". Pin and sew to top/bottom of quilt center. Quilt measures 17" square. So fun!

I can't wait to show you the super easy pieced border for next week - you'll LOVE it!


With the techniques we've learned so far, these two projects in Crazy for Minis are a breeze!

Fair & Square

Autumn Sky

Comment here to win an assortment of 4 KT Mini Charm packs. What a great start to all the cool projects in Crazy for Minis!

Please let me know if you have questions. You can email me directly at lynnedesigner@ktquilts.com for a private chat, if you prefer.