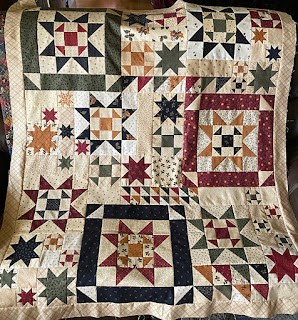
Block #17 - Churn Dash Star
I can't believe we're already on Block #17! Only a few more weeks to go and we'll be making the pieced border and putting our quilt together.
Today's block combines two of my favorites - a churn dash and a star. (More on that later.) Both are simple to piece with traditional half square triangles (HST) and star points made with connecting corners (CC). Your reference sheet has step-by-step tips for both units.
The Churn Dash
First, we'll piece (3) churn dash blocks - (2) for the Churn Dash Star blocks and (1) for a filler block. For perfect HST, cut the squares oversized and trim to the exact measurement. I made mine red, green and black. I set the black churn dash aside for my filler block.
The Star Points
Next, we'll use the connecting corner (CC) method to create the star point units. If you have ever cut off the star points or blunted the point of the intersection when piecing your block into the quilt, #3 is the most important step. If the 90degree corners line up, you're good to go. (From CC Info Sheet)
Piece the blocks as shown in the instructions with a churn dash block for the center. Make (2) Churn Dash Star blocks.
Assemble the Section
We pieced the checkerboard filler a few weeks ago, so we have all the ingredients to make the Churn Dash Star section. Add the tan background strips, as indicated in the pattern, and sew it all together. You're one step closer to a finished quilt!
Star Cluster Giveaway
As I was designing this block, I tried it in a couple of sizes for the BOM quilt. I really liked the idea of multiple sizes of churn dash and star blocks, so I made a quilt called Star Cluster with a Through the Year fat 1/8 bundle. In the instructions, we piece the larger blocks first to practice/perfect our HST and CC, then move on to more challenging 4 1/2" and 2 1/2" stars and churn dash blocks. I love it!
And I hope you do, too. Want a chance to win the PDF downloadable pattern of Star Cluster? Comment below with your favorite quilting tip. Winner announced September 30th with Block #18.
I love it so much I made a second quilt in my Sweet Holly Christmas fabric. The pieced borders are done, just waiting for a free weekend to finish. Maybe before Christmas???


Make half square triangles slightly oversized and then square up. For example, if finished size is 2", most patterns will have you cut squares 2 7/8". If however you cut them 3", sew, and then square up to 2 1/2" with a bloc loc ruler or regular ruler with a diagonal line. Better chance of always being accurate. mceddins@earthlink.net
ReplyDeleteI always do that. It's a great tip!
DeleteI've already bought Star Cluster and the fat eighth for it, and I look forward to starting it. But here's a tip anyway: read all the way through the directions before starting a quilt! I have been known to leap into cutting and then discover a better way to handle it, to my despair!
ReplyDeleteRead twice, cut once? Could be a new thing.
DeleteA design wall is the best thing I did for myself. It is made out of styrofoam boards and taped together with red duct tape. Batting is pinned on top and sides of the wall and is covered with a white flat sheet that is also pinned in place. I do have to use pins to pin my blocks up, but the sheet helps to keep the look clean with no threads clinging to the sheet. My design wall can be folded (by unpinning the batting and sheet) and moved out of the way when necessary. When I'm making a scrappy quilt or changing the colours in a pattern, I can see the overall effect on the design wall and make changes in colour choices as the top grows.
ReplyDeleteLove your idea. I can't wait to make a design wall for my new studio.
Deleteoh it's lovely!! I don't have any quilting tips as i'm not a seasoned quilter. Everything I know, i've learned from others. Does this still count?
ReplyDeleteAbsolutely! I'm still learning after 30 years of quilting.
DeleteI love all the stars in the quilt, such a great pattern!
ReplyDeleteFor my design wall I use the folding cardboard mats that I used when made my clothes. You open the board and cover the front with white flannel and wrap about 2 inches to the back. On the back side glue or tape the 2 inches. Get 2 curtain rods that come out from the wall 3 or 4 inches (the ones used to hang sheer curtains). Use big binder clips to clip the board to the curtain rods, then rest the board against the wall. It is portable. It can be folded up if you don't want it out all the time. Not my original idea I learned about making it in a class I took a long time ago.
Love all the flannel board ideas, thanks!
DeleteStarch fabric before you cut, helps stabilize bias edges.
ReplyDeleteI've only been religiously doing this for the last 5 years or so. SUCH a big help!
Delete