
KT Winner
The winner of the Crazy for Minis book and Bees 'n Blooms Mini Charm isVicki T - What a great way to make flying geese. I agree ~ GENIUS! I've never been afraid to make them the usual way, but doing it this way you erase the fear whether you'll be having to unpick seams because you've stitched too far in and lost your points. Love it! Thank you for showing us to make them this way.
So fun to see all your comments each week. Keep 'em coming!
KT Stitch With Me - Week #4
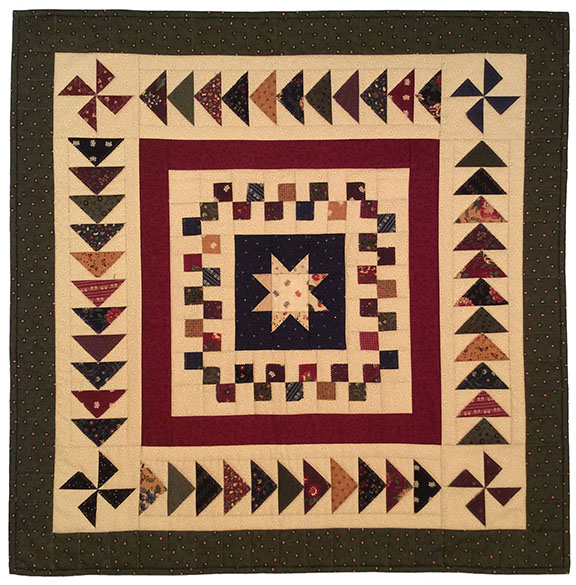
Are you having fun yet? I can't wait for you to finish your MC Sampler! Now that we've pieced a star, surrounded it with checkerboard squares and a red border, we're ready to add our border of flying geese. Just for fun, let's make some easy pinwheels for the corners!Pinwheels
Cut: (4) 2 1/2" mini charm squares (X) - cut a square twice diagonally to yield 4 triangles
Tan background - (16) 2 3/4" sq.
Outer Border - (4) 2 1/2" x WOF (width of fabric)
Binding - (4) 2 1/2" x WOF
Select (4) dark MC squares for the pinwheels. I chose red, green, navy & purple. Cut each MC 2 1/2" square into (4) triangles, as shown.
 |
| Cut (4) MC squares into 4 triangles each. |
Position the (4) matching triangles on the inside corners of (4) tan background 2 3/4" squares with triangle points even with tan background corner (no points extending); glue in place.

Topstitch 1/8" from raw bias edge of 90 degree angle of triangles with coordinating cotton thread. Remember, there's no need to stitch around the long side of the triangles since that will be in the seam allowance.
 |
| Topstitch triangles 1/8" from raw bias edges. |
Sew (4) matching layered triangles together in a pinwheel block that measures 5" square; press as below.

 |
| For the least bulk, press as shown. |

Trim (2) outer border strips to the length of your quilt. Pin and stitch to opposite sides of quilt center; press toward outer border. Trim (2) outer border strips to the length of the top/bottom of quilt. Pin and stitch to top and bottom of quilt center; press toward outer border. Quilt measures 30" square.
Sandwich quilt top, batting and backing using the method of your choice. Lois quilted in-the-ditch, following the seam lines and echo-quilting the layered patchwork on the star points, checkerboard and flying geese. Trim batting and backing. Bind with double 2 1/2" binding pieced end-to-end with mitered seams to at least 132" long.
Wahoo! We're done! Happy Dance! Treat yourself to a trip to the quilt shop!
Thank you all so much for joining me here these past few weeks for the first ever KT Stitch With Me.I hope you've enjoyed piecing my MC Sampler using our layered patchwork technique as much as I have loved sharing it with you. Want more ideas using this method and Mini Charms? Grab a Crazy for Minis book for more inspiration for little quilts with lots of charm.Comment here for a chance to win the Crazy for Minis book, plus a pile of mini charm squares leftover from all the projects in the book. What a great start to your next mini quilt!

I haven't been stitching along but I think I need to make this. It is beautiful. I know I have plenty of KT fabrics to make it. Thanks for sharing.
ReplyDeleteHi Karen
ReplyDeleteI loved working on this project soooooo much I would love to have your book. I enjoyed learning the great techniques used when working with MCs And the fun part is they are always on special at our local amazing quilt store. I will ask if she has your book.
Thanks for all of this. Would love another similar project in the future
Mary in Nova Scotia.
I'm printing the instructions out for this project !! I wasn't able to join in because January until March are very busy for me at work, topped off with family health issues and a bad sprained ankle. Wish I could have had the time and "foot" to press on the sewing pedal ! Would love to have this book ! It is on my wish list.
ReplyDeleteLisa, FYI we've included the instructions for the MC Sampler from the blog in the book, too!
DeleteThank you - I've enjoyed the "Stitch with Me" and looking forward to doing more with the mini charms. KT fabrics are some of my very favorites.
ReplyDeleteWhat great techniques for making some of those more difficult blocks. Thanks for sharing your expertise and creativity.
ReplyDeleteCharlotte
I have enjoyed sewing with your method, it seems to suit me very well. I'd love to win the book! Bev Eckert
ReplyDeleteWhat a fun quilt! Why have I never thought of making these units by top stitching??? Great technique. Thank you so much for the pattern tutorial!
ReplyDeleteLove your way of making blocks. No piecing the old way, but adding fabric on top. Would love to have this new book as I am only making minis now. Thanks for the new way and great little quilt.
ReplyDeleteHI,LOVED YOUR POST! THANKS FOR SHARING A SWEET GIVEAWAY TOO! msstitcher1214@gmail.com
ReplyDeleteThank you very much for a wonderful mini quilt. I just love it. I am now a convert to minis.
ReplyDeleteThank you for the sew along. I got behind and didn't get last week's part sewn yet. But will have it finished before the month is out. And thank you for the giveaway. tlcook1@speedyquick.net
ReplyDeleteI just finished and I love it!! What will I do next Monday??? Thx!
ReplyDeletelove the pin wheels
ReplyDeleteI am way behind today, but am sure happy to finally get to the next step in this Stitch With Me after reading the very top. How fun. Thank you so much Lynne. I can't wait to get this book.
ReplyDeleteI haven't had any chance to start stitching any of these, but am now printing them all out. (I did see you commented to another comment that all these steps are in the book) Every week I hope to do something on my machine and it seems something always happens. I very much hope to do something this week for sure. I NEED to sew. I can't wait to work on this though as it appears to be something I can do fairly quickly as long as I don't mess something up. LOL
I can't wait to see what this looks like once I'm done stitching all the steps you've been so nice to post each week.
Thank you. I am going to email you as I assume you'll need my mailing info as well. As of right now, I don't see any emails from you so I'll send you one. Charter emails have been extremely slow getting to me for more than three months now so if you did email, it will arrive at some point. LOL Thank you again.
LOVE your techniques! I have a bunch of your books, would be thrilled to own this one also. Thanks for letting us stitch with you. ;-> Toni Anne
ReplyDeleteSuch good techniques and tips - thank you! I like minis but my best friends loves them - I would love to share this with her!
ReplyDeleteThanks for sharing all your great tips. I am loving minis.
ReplyDeleteWhat a darling quilt. It is fun to see how you use your layered technique. Thanks for this sew along. It was great! K- lkw2x6-apq@yahoo.com
ReplyDeleteWhat a great way to make pinwheels. I wish I had known how to do this when I made a pinwheel quilt awhile back. I can definitely see another in my future thanks to the layered method.
ReplyDeleteLynne, I jumped into this project yesterday and am ready to start week four today. Thanks so much for a wonderful pattern. Great fun to use your layered patchwork!
ReplyDeletePinwheels look neat. I'd love to do some minis, and I'm sure your method would make it much easier!
ReplyDeletePinwheels look neat. I'd love to do some minis, and I'm sure your method would make it much easier!
ReplyDeleteI love it!!! This is a beautiful mini quilt!! And so quick with your layered method. I've loved your pinwheel quilt for a long time----such an easy way to make pinwheels!
ReplyDeleteLove love love it! Can't wait to finish mine!
ReplyDeleteEnjoy your fabrics.
ReplyDeleteLove your fabric shades. They all go together so well.
ReplyDeleteThanks so much for the stitch along. My project still needs to be quilted but I'm very pleased with how it turned out.
ReplyDeleteI am happy to see I wasn't the only person who wasn't able to quilt along. I can't wait to get started but have to finish a couple other projects first. I hope Lynne can continue with similar projects.
ReplyDeleteI love all the mini charms and am always looking for new ways to use them in a quilt. You have such great ideas and use such wonderful colors.
ReplyDeleteLynne, thanks so much for sharing you techniques using the mini charms, so much easier than traditional methods. I LOVE how your sampler came out!
ReplyDeleteIt has been so fun completing this project with you, I just love it!! Looking forward to checking out all the others in the book.
ReplyDeleteLiving here in Ottawa, Canada we only have three Quilt shops and none of them carry the mini precuts! I have recently become interested in mini quilts through your blog and would love to have a chance to win the book and what ever scraps come along with it. Love, love everything about your blog.
ReplyDeleteLove mini's! Didn't get all the lessons. Any place I can find them?
ReplyDeleteClick below on "Older Posts". You can go back to the beginning and follow along.
DeleteFantastic pattern and thanks for sharing it with us. Love those minis.
ReplyDeleteOh my, I love everything about this!
ReplyDeleteSewing with your layered method has been fun. I love the finished mini quilt!! Thank you for the chance in the giveaway.
ReplyDeletethis mini quilt has been SEW much fun, thanks for the pattern and tutorials.
ReplyDeleteThe quilt is darling! I love to buy the mini charm packs but don't always knows what I will make with them. Your book has solved that dilemma! Thank you for the giveaway!
ReplyDeleteThis mini looks so so great I need to make it!
ReplyDeleteI haven't been sewing along, but I think I might have to go back and start now.
ReplyDeletejen dot barnard at btinternet dot com
WOW - only 4 weeks to complete this cute adorable quilt! So much fun. Thanks for the great pattern.
ReplyDeleteWow, I really like this. I didn't sew along, but now I feel like making one. Thanks for all the fun.
ReplyDeleteWhat a great way to make pinwheels! The quilt is so beautiful. Thanks for the giveaway opportunity.
ReplyDelete*L*O*V*E* your finished mini quilt!
ReplyDeleteI like the flying geese and the pinwheels - thank you for the tutorial!
ReplyDeleteJust a note to let you know I love this wall hanging and ready to do more for Christmas gifts. I am a quilter of larger quilts and was looking to something smaller and faster.the fabrics are beautiful and work so well together. Can't wait to get started on many more. Thank you so much Patrica.
ReplyDeleteLoving the Mini's, sew much my speed with the limited space I have to work. Finally a quick way of making Flying Geese that don't lose the points! :)
ReplyDeleteWhat a fun and easy block! Thank you for sharing the directions.
ReplyDeleteI just finished my top! I'm sew pleased with your layering method and how quickly this quilt went together. Thanks so much for your tutorial and generosity. Much appreciated!
ReplyDeleteJust a note to let you know I love this wall hanging and ready to do more for Christmas gifts. I am a quilter of larger quilts and was looking to something smaller and faster.the fabrics are beautiful and work so well together. Can't wait to get started on many more. Thank you so much Patrica.
ReplyDeleteI got a late start on this, but I am loving it. Layered patchwork is so fun. I have both rulers and Layers of Love, now Crazy for Minis will be the next. Love this technique! Thanks for the Stitch With Me.
ReplyDeleteHad a great time at our retreat here in Bennington this weekend
ReplyDeleteWe are having a wonderful weekend at the Kansas Troubles retreat center
ReplyDeleteSo much fun putting this together. Thanks for sharing it with us. Rina
ReplyDeleteI love the mini's. They go together so quickly and can be used in so many places in my home....or they make a quick gift!
ReplyDelete